Congratulations to Cicadaman & co. for getting Froyo running on the Nook Color! Visit the nook Color portal!
See Rooting new hardware FIRST if you have a nook original with a 1003* serial# or above.
NookTouch Rooting
From nookDevs
Revision as of 22:49, 7 June 2011 by Jesusfreke (Talk | contribs)
|
 |
To start the rooting process please scroll down...
Contents |
Brief overview of rooting process (see below for more in-depth instructions)
- Download noogie.img.gz and uRamdisk_rooted
- ungzip and write noogie.img.gz to an sdcard
- boot nook touch with sdcard inserted
- the internal eMMC storage of the device will be exported via usb mass storage, allowing you to access it from your computer
- replace uRamdisk on first partition (labeled "boot") with the downloaded uRamdisk_rooted
- remove sdcard from nook touch and reboot (hold power for 10-15 seconds)
- once booted, connect nook touch to wifi
-
adb connect
-
adb shell
- \o/
How To Do It
Pre-requisites
- You need a B&N Nook Touch
- You need a 128 MB or higher microSD card that you are willing to completely erase. ( Note: It's recommended you use a Class 6 microSD card as a lower grade card may have issues. )
- You need access to a computer.
- the computer must be able to read and write a microSD card
- the computer must have a working USB port to talk to the nook.
- You need a working wifi connection for the Nook Touch
- You must have a program to write disk images, either dd (Linux or Mac) or Win32DiskImager (Windows) software (details below).
This process can be done from a Linux, Windows or Mac machine.
|
Note: You should use a dedicated USB card reader or a SD card adapter. Devices with integrated card readers (cameras, smartphones, the Nook itself) will generally not work - they are unable to modify the partition table correctly, and the SD card will not boot. A very few devices will work for this, if yours did, count yourself lucky. Walmart sells USB sd readers for under $10.
|
Unlike Linux and Mac, Windows does not include 'dd' so you will want to install win32DiskImager for writing the image to the microSD. win32DiskImager is a program written for the Ubuntu project to write disk images. Simply download the zip to a folder and run the Win32DiskImager.exe. No installation is required.
Steps
- download noogie.img.gz
- download uRamdisk_rooted
-
gunzip noogie.img.gz
- Write the sdcard image
-
-
For Linux Users:
-
-
- Bring up a terminal
- Navigate to the directory that contains noogie.img
- Ensure your sd card is unmounted (run as root)
-
# umount /dev/
whereis your sdcard (for example /dev/sdc or /dev/mmcblk0, not the mount point of the sdcard or an existing partition like sdc1 or mmcblk0p1) Don't just copy the term you need to know the name of the sdcard's device. Please be sure you're writing to your sdcard and not to your hard disk. This is dangerous.
-
- write the image to your sdcard. (run as root)
- WARNING: If you write to the wrong device, you will corrupt your hard drive
- WARNING: This will completely erase your sdcard. Be sure to back it up!
-
# dd if=noogie.img of=/dev/
bs=1M
-
-
-
For Windows users:

-
-
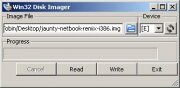
- Run Win32DiskImage.exe
- Click the folder button and navigate to select the img file you just unzipped.
- Click on the disk drive letter label on the right, and choose the letter that corresponds to your SD card.
- Press Write. When it finishes, press Exit.
- WARNING: This will completely erase your sdcard. Be sure to back it up!
-
-
-
For Mac Users:
-
-
- Open a terminal window.
- Find which drive the sdcard is mapped to: type in the terminal this:
diskutil list
- Be very careful to identify the sdcard and not your hard disk. Be VERY careful.
- Now unmount that drive typing this:
diskutil unmountDisk /dev/disk#
(My computer is was disk2 replace # with your number. Do NOT use the disk#s# ) - The computer should say: Unmount of all volumes on disk<#> was successful
- WARNING: If you write to the wrong device, you will corrupt your hard drive
- WARNING: This will completely erase your sdcard. Be sure to back it up!
-
dd if=/path/to/noogie.img of=/dev/rdisk# bs=1m
-
Everything needed should copy right over to the card.
- TIP: drag and drop the image file from your finder into the terminal window, and the file path will fill in
- TIP: you must replace "/path/to/" with the path where the auto-nooter image file is located (do not type "/path/to/")
-
-
-
After you have written the sdcard
- View the contents of the sdcard on your computer. You should see the following files. If you don't, you did something wrong... please review the prerequisites and the steps and try again.
- boot.scr
- boot.script
- booting.pgm
- cfg.bin
- flash_spl.bin
- MLO
- regenerate_bootscript.sh
- u-boot.bin
- uImage
- uRamdisk
- wvf.bin
- Remove the sdcard from your computer.
- Shut down the Nook Touch completely
- Hold the power button until prompted and choose power off
- Insert the sdcard into your Nook Touch
- Plug in your Nook Touch to your computer via USB
- Press the power button
- You should see the led beside the usb port turn green for a few seconds and then go back to orange. A splash screen will be displayed on the eink display
- After a few seconds (15-20), the Nook Touch will finish booting, and it will mount the internal storage. You should see 7 partitions
- (Optional) At this point, you can make a backup of your device, in case you need to need to restore the firmware to original state in the future
-
dd if=/dev/
of=nook_touch_backup.img bs=1M - This will take several minutes, and will create a 2GB file
- After it is finished, double check and make sure the file is exactly 1958739968 bytes
-
- Find the partition with the label "boot"
- Replace uRamdisk on that partition with the downloaded uRamdisk_rooted
- Unmount all partitions and unplug the Nook Touch
- Remove the sdcard from the Nook Touch
- Reboot the Nook Touch (hold power button for 10-15 seconds)
- The nook should boot up normally
- Connect to a wifi access point on your Nook Touch
- Your computer needs to be on the same network as the Nook Touch
-
adb connect
-
adb shell
- Raise hands in victory
\o/
- View the contents of the sdcard on your computer. You should see the following files. If you don't, you did something wrong... please review the prerequisites and the steps and try again.


